by tom44 | Jul 13, 2018 | DIY Sculpting

Stone carving is an art by itself, and creating sculptures from marble even more so. If you love working with this material, then you must be specific and accurate in your decisions. You can easily assume it is easy to carve and sculpt until you take a closer look at a chunk of marble, or better yet, a completed sculpture made of marble.
The cuts and shapes of a finished marble sculpture are precise and carefully chipped to give a specific shape desired by a sculptor.
Marble sculpting differs in various parts of the world because of the techniques used in shaping the stones; however, sculptors share techniques that attribute to similarities in the end result of marble creations.
Traditionally, stone carving is associated with axes and chisels. Irrespective of a sculptor´s location, these are primary tools in a carving environment.
However, sculpting marble requires enhanced tools and special skill to bring out the desired beauty of the stone.
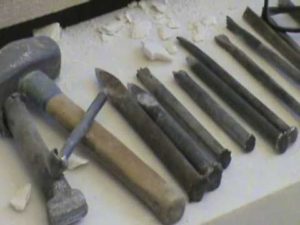
Here are the necessary tools you need for sculpting marble :
Quarry Pick
This is a primary tool in stone carving. It is 80 cm long with a double metal head that is sharpened on both ends to increase efficiency when digging. The initial process of carving require force and energy, which is only made easy by sharp tools.
This is the primary essence of the hardened head of the quarry pick, which breaks hard particles of the stones covering a chunk of marble. This precious stone is usually hidden between tough rocks where the only way is to break them before uncovering the marble.
Sculptor’s Pick
This is a small version of the quarry pick. It measures 60 cm long with two sharp ends. The sculptor’s pick is meant for precision and fine-tuning of the edges cracked by the quarry pick. It is held by two hands on its wooden handle; the tool is related to an advanced level of expertise because only experienced sculptors use it in finalizing the marble sculpting stages.
Wedge
Wedges are indispensable tools in marble sculpting. As mentioned, marble is a fine stone that is covered by tough rocks that can only be broken by pressure and extreme force.
Sculptors take advantage of holes on a rock to establish a line of weakness and fault lines. Wedges are installed in these spaces on a rock to capitalize on the bedding lines that lead to expansion hence splitting of the rock.
Wedges can either be wooden or metal; while wooden wedges are weaker, they are equally effective in mounting pressure. Sculptors soak wooden wedges in water and wait for it to saturate hence expanding the holes on a rock.
Point
No stone carving can be successful without a point. This sculpting tool measures 20-30cm long depending on the type of stone and material of the rock. In the case of marble, it is longer than in any other stone carving tool. The long length of the point ensures it penetrates the stone as deep as possible to hit the precious marble within rocks.
On one end, the point has a pyramid shape while on the other side it is flat. A point is used with a hammer; it hits directly on a rock to break and shape a rock. It is a basic tool in carving, and personally, I like working with this tool because I can use it to take out my frustrations by breaking hard rocks with ease. A feeling of empowerment to be sure !
Tooth Chisel
It is also called a claw chisel because of its shape on one end. The functional part of the chisel usually consists of teeth between 3 to 5 that hit on a rock to weaken its structure. Typically, tooth chisels consist of a long shaft and small diameter.
As one end is clawed, the other is flat where a mallet or hammer hits to break a rock. How a tooth chisel is held by a sculptor determine show deep it goes through the rock. For a marble, sculptors proceed with caution by holding the chisel at 40 degree angle instead of vertically.
Flat chisel
This particular instrument also consists of a relatively long shaft and short diameter. Sculptors vary the type of chisels as tools in sculpting marble because they lead to different results. Unlike a tooth chisel, a flat chisel leaves no line traces on the final marble piece.
The lines drawn by other tools can easily be polished with this sculpting tool. Flat chisels are either round or square in shape, which enhances the cutting process. The width of flat chisels vary between 0.5 to 10 cm to give different shapes and sizes.
Roundel
This tool is similar to a flat chisel only that it is rounded on the sharp end. Differentiating a flat chisel with a roundel can be difficult considering they are all sharp on this end. A fat chisel can also be easily turned to a roundel because of the pressure imposed by a hammer or wooden mallet often used in sculpting.
This tool is commonly used for softer stones, but even for use on marble as well, because its bending structure compromises on its sharp effectiveness. Just like the flat chisel, most sculptors prefer holding it at 35-60 degrees angle to gently break into the rock.
The roundel is really good for making hollows in the marble. This tool will most likely be one of your favorites. It certainly is one of mine, and I even gave mine a name : “Smeagol”
I hope this post provided you with the info you were looking for. Have a wonderful day with your craft making !
by tom44 | Jul 9, 2018 | DIY Pottery

The best thing about learning how to make a vase out of air dry clay is that the possibilities for decorating are endless once you are good at it.
Get Creative !
No matter how creative you are or aren`t, you can probably think of various designs and sizes suited for your needs. And, there is no need for you to fire the vase in a hot kiln.
Since it’s air dried rather than baked, the clay is a bit fragile. To make your vase sturdier, you can use a real glass vase that you can purchase at a thrift store and model the clay around it. This serves a dual purpose to prevent the possibility that the vase might leak.
This might seem daunting, yet the vase is easy to make and probably would take you an hour to craft it. The clay needs to dry for one to two days before you paint it, so always keep that in your mind.
Supplies You Will Need
To make a vase out of air dry clay, you will need some things and these include some good air dry modeling clay, vase for shaping, rolling pin, paint, wax paper and a butter knife or carving tool.
Roll Up Your Sleeves
The first thing that you should do is to protect the surface you will be working on. You can tape down big sections of the wax paper, which you can use for covering your rolling pin. Wash it and dry your vase thoroughly. Get rid of the clay from the package and use the sticker for sealing the remaining clay so it does not dry out. Then, warm up the air dry clay in your hands through kneading it so it’ll be much easier to roll out.
When the clay is malleable, try placing it at the center of your work surface and start rolling it out. It could take a little patience and time, yet go slow so you do not tear the clay. Remember that it’s different from the pottery clay in that isn’t as simple to meld the pieces and that using some water does not seal imperfections easily.
Continue rolling out the clay in the same manner that you’d roll pie dough with controlled rolls from the circle’s center working towards outside. In that case, you would want to roll your clay in a rectangular shape. Lift consistently and flip the clay over while you are rolling out to avoid it from sticking on a side.
Important Tips
If your clay is thick, use the vase as the ruler to cut the excess clay on the bottom and top. After that, cut the clean edge on a side and roll the vase until this meets the clay on the side.
You must be careful not to roll the clay too much. The clay might shrink a bit once it dries and rolling it very tightly would cause its outer vase to crack. Leave the short lip for overlay and cut the excess clay.
Using a small amount of water, wet its bottom edge and cover an overlapping clay. With the use of your fingers, press and try sealing the edge. Cut off any excess clay at the bottom and smooth the edges under the vase.

Roll the excess clay over its top and in your vase to make a rounded lip. Then, start designing your vase. You may use anything to carve. You can use a butter knife and draw some simple ridges around your vase. Paint your vase with any designs, patterns and colors that your heart desires. Take your time and make your creation something that will make people catch their breath !
I have a feeling that you might enjoy this post – How To Make Sea Glass Light Fixtures so go check it out while you’re here ! And… please give this post a like on Facebook for me ? I would really appreciate it !
by tom44 | Jul 8, 2018 | DIY Pottery

Making ceramics at home without a kiln may not seem like an achievable task but even those who find themselves on a smaller budget are able to do so.
While most would expect not to be able to carry out this process without the usage of a kiln, there are ways around this issue. In this article, I will try to point out what I think are the most important things to keep in mind, based on my experience.
Be Safe !
Since the kiln is used to contain the heat so that higher temperatures can be reached without the excessive usage of fuel, it is important to follow all of the safety regulations when making ceramics at home without a kiln. Be sure to research the local regulations and fire safety codes before proceeding.
Keeping a sizable amount of water close by is also in your best interests. Don’t leave the fire unattended and have a shovel and some dirt handy. In order to get started, you will need a pile of wood. Some dry kindling is the perfect choice. Place this dry kindling inside of a stone or brick ring.
Clean the area first so that the fire is not at risk of spreading. The pottery is then place on top of the dry kindling pile. Once the wood begins to burn, the pots may be at risk of tumbling into the ashes so bear this in mind while arranging it. Believe me, when this happens it is extremely frustrating !

More Common Sense Tips
If you have any additional stones and bricks that can be used as a means of supporting the pile, it is a good idea to add them at this time. Leaving enough space for the kindling to successfully fuel the fire is a crucial step in the process. Some may decide that they wish to place broken pottery pieces onto the fire as well. I usually do this as well.
Tin roof scraps and old tin cans are also used by many people. Create an exhaust opening at the top and provide the proper coverage. By using animal dung or swamp grass as an added layer, this will trap the heat inside. The moisture will keep the heat in and allow you to avoid the annoyances associated with having the fire burn off too soon.
Proper Ventilation Tips
Vent openings need to be added to the bottom of the fire. The wood needs to get air so that the clay can bake and burn at its hottest. When creating the top exhaust opening, remember the importance of allowing air flow to take place at the bottom. To start the fire, wads of paper can be lit at the vents.
Having worries about breakage ? Providing the top vent with some partial coverage serves to restrict the burn. Do not close the vent for long, though. Otherwise, the fuel will not burn as quickly or reach the proper temperature. As soon as the fuel has finished burning, cover up the area with some dry dirt.
Those who are looking to create black ceramics enjoy this tactic because it chokes off the air and gives them darker pots. Wait until the temperature has cooled before attempting to retrieve your handiwork. You don`t want any burned fingers because of your impatience. I had to learn this patience the hard way (by burning my fingers at least 5 or 6 times). There are going to be mistakes along the way but there is nothing wrong with simply enjoying the process as much as possible.
Trial And Error
Experimentation is the name of the game. Some mistakes are going to be made. Believe me when I tell you : I probably made dozens of mistakes in my first 3 or 4 months trying to make my own pottery at home. This process is all about trial and error. The pots need to be crafted at a uniform level of thickness so that they will not break. If limestone is included, this is going to cause serious problems. Lime contaminants cause pieces of the clay to pop off when they are exposed to the atmosphere.
Pre-Dry Pieces In Your Kitchen Stove
While a kitchen stove is never going to provide the temperatures that are needed for a project of this magnitude, these stoves can play a very important role in the process. Pre-drying the pieces before they are taken outside to be fired is a pivotal step. Setting the oven at 190 degrees is a great way to dry them so that accidents do not take place in an outdoor setting.
Resist the temptation to use a kitchen stove in place of a kiln. This may seem like a smart idea in the moment but you are only placing yourself at risk of having a fire take place. The temperatures that are needed to handle this task are simply not attainable indoors. Clay needs to be fired at a temperature of at least 1,000 degrees.
There is no oven in your home that can replicate these temperatures safely. The safety features that have been designed for the stove are not going to allow you to reach these temperatures. The clay is not going to turn into ceramics that can be sold to a willing customer and this will serve as a waste of money and supplies, as well as probably having angry customers demanding refunds !
Continue With Your Experiments
If the pots that are created end up dissolving in water, this a sign that you did not make the fire hot enough. The color and texture is going to be much different when you create ceramics at home without a kiln and you need to be willing to experiment. Colors and textures are always going to vary. These are not defects, this is just simply part of the learning stage. I did a lot of experimentation when I began making pottery at home, and I also started without having a kiln.
Water may soak through the pot and this is not a defect either. As long as the clay was fired at the proper temperature, this is not an issue that will lead to any long term damages. Pieces can still be created from home to sell to potential customers even if you do not have a kiln. Just be sure you are 100% honest with your customers about this. All you need to do is follow the aforementioned directions and you are well on your way to creating some really nice ceramics !
Please Share on Facebook OR