by tom44 | Jul 16, 2018 | DIY Sculpting

Introduction
Sculpting has been one of the most prolific visual art forms practiced across millennia by almost every civilization that has ever existed.
Sculptures and sculptors have shaped generations and civilizations, touching all aspects of art, culture, culinary art, politics and more. It is the innate expression of the inner self on materials which do not possess life to convey human emotions, meaning and beauty.
Sculpting transforms dead stone, marble or other materials into statues or other beautiful creations breathing with life. It transforms simple sundry things into objects of wonder, beauty and joy.
Sculpting beautifies the architecture and landscaping of any city or residence with installations of statutes or just any abstract creation which was made by sculpting.
Sculpting defines spaces, volumes and shapes of modern metropolis architecture.
History Of Sculpting
Earliest sculpting works can be found in prehistoric reliefs and motifs found in ancient dwellings, altars and mounds of the dead. The art of sculpting gave the modern coin its widely accepted form of embossed monetary value, the seal and the insignia.
One prominent figure that immediately pops into anyone`s mind at the very mention of sculpting is the great Italian painter, sculptor, architect and poet Michelangelo di Lodovico Buonarroti Simoni or just “Michelangelo” as he is commonly known.
Of course the history and mastery of sculpting precedes the High Renaissance greats, but the very subject can’t be left without mentioning the splendid fine marble sculpting works of the Florencial prodigy. Pieta and David, his masterpieces are works of wonder which he sculpted before he was even thirty.
Among modern sculptors, Auguste Rodin features prominently since he is well known for his magnifique “Thinking Man” or also called “The Thinker” which is a timeless bronze sculpture located in Paris.
The major types of sculpting forms or techniques are subtractive, which is carving, chipping or in some way removing material to create and form a piece of sculpture, along with additive (also called modelling), casting (or molding a creation from melted material) and mixed technique (constructing, joining or assembling different materials).
Stone Carving or Stone Sculpting
Stone carving as the name suggest is sculpture practiced in stone, carving the rugged edges of different types of stones, churning out a finished product that seems surreal for the stone to have become.
Stone sculpting is also one of the earliest form of sculpting and can be seen in countless Temples, Buddha Viharas, Tombs, Mounds and Archaeological artefacts from across many civilizations throughout history around the entire world.
Wood Carving or Wood Sculpting
Wood carving is amongst the most popular techniques or forms of sculpting. There are sub genres of wood sculpting techniques that range from methodologies to varying forms of wood work.
The most ancient form of wood carving can be found in the form of Totems and Poles carved out for divination purposes. Wood is a material which gives a beginning art amateur a good scope for learning the titbits of techniques like chiselling, carving, etc, and help in learning the basics like blocking and volume, among other skills.
Marble Sculpting
Marble carving is one the best known forms of the sculpting art and the most appreciated owing to the complexity of the process and the rather challenging learning curve that needs years and years of practice. Marble is derived from limestone and offers a good base to carve a curve off the intricate calcite that forms the large marble stones.
Ivory Carving or Sculpting
Ivory carving is an illegal art form as it needs carving out of animal tusks or teeth which are primarily obtained from Elephants, Walruses and Rhinoceros.
The Venus of Brassempouy which is thousands of year old is one of the famous prehistoric ivory sculptures that depicts (along with the Islamic Ivory) how widely prevalent the art form was and how large swaths of animals were poached for the purpose of obtaining ivory to create sculptures.
Sand Sculpting
The art of modelling sand into an original and interesting creation is called “sand art” or “sand sculpting” and has become increasingly popular over the past couple of decades. Since the only 2 materials required for this particular type of sculpting are sand and water, this is probably the best sculpting activity for anyone with limited funds. The only tools you will need are your own 2 hands, or if you prefer, you can also use buckets and shovels of any size you choose.

The pic above is of a sand sculpture (of a dolphin in case you were wondering) which I created with my own 2 hands 🙂
Bronze Casting
Bronze is another widely practiced and proliferated form of sculpting art. Bronze cast is done with bronze alloys and uses techniques like the lost-wax casting to attain the desirable shapes and figurines. This particular type of sculpting pre-dates marble carving.
Some other popular sculpting forms which can be practiced by kids and adults alike for passion, profession or mere hobby are :
Semi Precious Stone Sculpting and Shell Carving
This is done by carving or sculpting semi-precious stones like rubies, opals, sapphires, etc. They are widely used to craft fashion accessories like rings, bracelets, necklaces, etc.
Conches and shells are carved and sold along beaches and in boutiques. They are usually in great demand in tourists spots. They also boost cottage industries and can be an excellent source of income for skilled artisans who traditionally practice this ancient form of sculpting.
Clay Sculpting or Modelling
Clay modelling is almost too much fun. Anyone can enjoy hours and hours of sculpting pleasure with this material.
Clay modelling is also used in Claymation which is actually animation done using clay models and figurines that are animated step by step using a plethora of techniques creating surreal imagery that is fascinating and entertaining to watch.
Sculpting As A Career
Sculpture as a vocation or career option should only be pursued by someone whose only pursuit is sculpture as means of creative expression.
This art form needs much devotion, dedication and perseverance in order to earn a living from it. The skills honed in the process of learning will pay dividends and give other forms of commercial visual art and communication a run for the money. Look for a good school or university with acclaimed mentors.
A mere YouTube video or two which demonstrate sculpting methods wouldn’t be nearly enough to learn the intricacies of becoming a fine sculptor.
Conclusion
As Pablo Picasso rightly inferred, “Sculpture is the art of the Intelligence”.
The art form is best appreciated by developing a keen insight and passion into the various facets of creating sculpture from scratch.
If you are a beginner or just trying to get hands on experience with different types of sculpting techniques, then start with very basic clay modelling. With much practice and determination it may be possible that one day you will create a sculpted masterpiece of your own.
by tom44 | Jul 13, 2018 | DIY Sculpting

Stone carving is an art by itself, and creating sculptures from marble even more so. If you love working with this material, then you must be specific and accurate in your decisions. You can easily assume it is easy to carve and sculpt until you take a closer look at a chunk of marble, or better yet, a completed sculpture made of marble.
The cuts and shapes of a finished marble sculpture are precise and carefully chipped to give a specific shape desired by a sculptor.
Marble sculpting differs in various parts of the world because of the techniques used in shaping the stones; however, sculptors share techniques that attribute to similarities in the end result of marble creations.
Traditionally, stone carving is associated with axes and chisels. Irrespective of a sculptor´s location, these are primary tools in a carving environment.
However, sculpting marble requires enhanced tools and special skill to bring out the desired beauty of the stone.
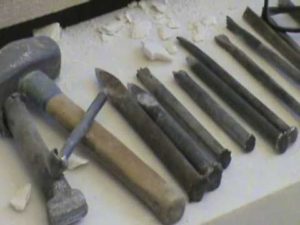
Here are the necessary tools you need for sculpting marble :
Quarry Pick
This is a primary tool in stone carving. It is 80 cm long with a double metal head that is sharpened on both ends to increase efficiency when digging. The initial process of carving require force and energy, which is only made easy by sharp tools.
This is the primary essence of the hardened head of the quarry pick, which breaks hard particles of the stones covering a chunk of marble. This precious stone is usually hidden between tough rocks where the only way is to break them before uncovering the marble.
Sculptor’s Pick
This is a small version of the quarry pick. It measures 60 cm long with two sharp ends. The sculptor’s pick is meant for precision and fine-tuning of the edges cracked by the quarry pick. It is held by two hands on its wooden handle; the tool is related to an advanced level of expertise because only experienced sculptors use it in finalizing the marble sculpting stages.
Wedge
Wedges are indispensable tools in marble sculpting. As mentioned, marble is a fine stone that is covered by tough rocks that can only be broken by pressure and extreme force.
Sculptors take advantage of holes on a rock to establish a line of weakness and fault lines. Wedges are installed in these spaces on a rock to capitalize on the bedding lines that lead to expansion hence splitting of the rock.
Wedges can either be wooden or metal; while wooden wedges are weaker, they are equally effective in mounting pressure. Sculptors soak wooden wedges in water and wait for it to saturate hence expanding the holes on a rock.
Point
No stone carving can be successful without a point. This sculpting tool measures 20-30cm long depending on the type of stone and material of the rock. In the case of marble, it is longer than in any other stone carving tool. The long length of the point ensures it penetrates the stone as deep as possible to hit the precious marble within rocks.
On one end, the point has a pyramid shape while on the other side it is flat. A point is used with a hammer; it hits directly on a rock to break and shape a rock. It is a basic tool in carving, and personally, I like working with this tool because I can use it to take out my frustrations by breaking hard rocks with ease. A feeling of empowerment to be sure !
Tooth Chisel
It is also called a claw chisel because of its shape on one end. The functional part of the chisel usually consists of teeth between 3 to 5 that hit on a rock to weaken its structure. Typically, tooth chisels consist of a long shaft and small diameter.
As one end is clawed, the other is flat where a mallet or hammer hits to break a rock. How a tooth chisel is held by a sculptor determine show deep it goes through the rock. For a marble, sculptors proceed with caution by holding the chisel at 40 degree angle instead of vertically.
Flat chisel
This particular instrument also consists of a relatively long shaft and short diameter. Sculptors vary the type of chisels as tools in sculpting marble because they lead to different results. Unlike a tooth chisel, a flat chisel leaves no line traces on the final marble piece.
The lines drawn by other tools can easily be polished with this sculpting tool. Flat chisels are either round or square in shape, which enhances the cutting process. The width of flat chisels vary between 0.5 to 10 cm to give different shapes and sizes.
Roundel
This tool is similar to a flat chisel only that it is rounded on the sharp end. Differentiating a flat chisel with a roundel can be difficult considering they are all sharp on this end. A fat chisel can also be easily turned to a roundel because of the pressure imposed by a hammer or wooden mallet often used in sculpting.
This tool is commonly used for softer stones, but even for use on marble as well, because its bending structure compromises on its sharp effectiveness. Just like the flat chisel, most sculptors prefer holding it at 35-60 degrees angle to gently break into the rock.
The roundel is really good for making hollows in the marble. This tool will most likely be one of your favorites. It certainly is one of mine, and I even gave mine a name : “Smeagol”
I hope this post provided you with the info you were looking for. Have a wonderful day with your craft making !
by tom44 | Jul 9, 2018 | DIY Pottery

The best thing about learning how to make a vase out of air dry clay is that the possibilities for decorating are endless once you are good at it.
Get Creative !
No matter how creative you are or aren`t, you can probably think of various designs and sizes suited for your needs. And, there is no need for you to fire the vase in a hot kiln.
Since it’s air dried rather than baked, the clay is a bit fragile. To make your vase sturdier, you can use a real glass vase that you can purchase at a thrift store and model the clay around it. This serves a dual purpose to prevent the possibility that the vase might leak.
This might seem daunting, yet the vase is easy to make and probably would take you an hour to craft it. The clay needs to dry for one to two days before you paint it, so always keep that in your mind.
Supplies You Will Need
To make a vase out of air dry clay, you will need some things and these include some good air dry modeling clay, vase for shaping, rolling pin, paint, wax paper and a butter knife or carving tool.
Roll Up Your Sleeves
The first thing that you should do is to protect the surface you will be working on. You can tape down big sections of the wax paper, which you can use for covering your rolling pin. Wash it and dry your vase thoroughly. Get rid of the clay from the package and use the sticker for sealing the remaining clay so it does not dry out. Then, warm up the air dry clay in your hands through kneading it so it’ll be much easier to roll out.
When the clay is malleable, try placing it at the center of your work surface and start rolling it out. It could take a little patience and time, yet go slow so you do not tear the clay. Remember that it’s different from the pottery clay in that isn’t as simple to meld the pieces and that using some water does not seal imperfections easily.
Continue rolling out the clay in the same manner that you’d roll pie dough with controlled rolls from the circle’s center working towards outside. In that case, you would want to roll your clay in a rectangular shape. Lift consistently and flip the clay over while you are rolling out to avoid it from sticking on a side.
Important Tips
If your clay is thick, use the vase as the ruler to cut the excess clay on the bottom and top. After that, cut the clean edge on a side and roll the vase until this meets the clay on the side.
You must be careful not to roll the clay too much. The clay might shrink a bit once it dries and rolling it very tightly would cause its outer vase to crack. Leave the short lip for overlay and cut the excess clay.
Using a small amount of water, wet its bottom edge and cover an overlapping clay. With the use of your fingers, press and try sealing the edge. Cut off any excess clay at the bottom and smooth the edges under the vase.

Roll the excess clay over its top and in your vase to make a rounded lip. Then, start designing your vase. You may use anything to carve. You can use a butter knife and draw some simple ridges around your vase. Paint your vase with any designs, patterns and colors that your heart desires. Take your time and make your creation something that will make people catch their breath !
I have a feeling that you might enjoy this post – How To Make Sea Glass Light Fixtures so go check it out while you’re here ! And… please give this post a like on Facebook for me ? I would really appreciate it !
by tom44 | Jul 8, 2018 | DIY Pottery

Making ceramics at home without a kiln may not seem like an achievable task but even those who find themselves on a smaller budget are able to do so.
While most would expect not to be able to carry out this process without the usage of a kiln, there are ways around this issue. In this article, I will try to point out what I think are the most important things to keep in mind, based on my experience.
Be Safe !
Since the kiln is used to contain the heat so that higher temperatures can be reached without the excessive usage of fuel, it is important to follow all of the safety regulations when making ceramics at home without a kiln. Be sure to research the local regulations and fire safety codes before proceeding.
Keeping a sizable amount of water close by is also in your best interests. Don’t leave the fire unattended and have a shovel and some dirt handy. In order to get started, you will need a pile of wood. Some dry kindling is the perfect choice. Place this dry kindling inside of a stone or brick ring.
Clean the area first so that the fire is not at risk of spreading. The pottery is then place on top of the dry kindling pile. Once the wood begins to burn, the pots may be at risk of tumbling into the ashes so bear this in mind while arranging it. Believe me, when this happens it is extremely frustrating !

More Common Sense Tips
If you have any additional stones and bricks that can be used as a means of supporting the pile, it is a good idea to add them at this time. Leaving enough space for the kindling to successfully fuel the fire is a crucial step in the process. Some may decide that they wish to place broken pottery pieces onto the fire as well. I usually do this as well.
Tin roof scraps and old tin cans are also used by many people. Create an exhaust opening at the top and provide the proper coverage. By using animal dung or swamp grass as an added layer, this will trap the heat inside. The moisture will keep the heat in and allow you to avoid the annoyances associated with having the fire burn off too soon.
Proper Ventilation Tips
Vent openings need to be added to the bottom of the fire. The wood needs to get air so that the clay can bake and burn at its hottest. When creating the top exhaust opening, remember the importance of allowing air flow to take place at the bottom. To start the fire, wads of paper can be lit at the vents.
Having worries about breakage ? Providing the top vent with some partial coverage serves to restrict the burn. Do not close the vent for long, though. Otherwise, the fuel will not burn as quickly or reach the proper temperature. As soon as the fuel has finished burning, cover up the area with some dry dirt.
Those who are looking to create black ceramics enjoy this tactic because it chokes off the air and gives them darker pots. Wait until the temperature has cooled before attempting to retrieve your handiwork. You don`t want any burned fingers because of your impatience. I had to learn this patience the hard way (by burning my fingers at least 5 or 6 times). There are going to be mistakes along the way but there is nothing wrong with simply enjoying the process as much as possible.
Trial And Error
Experimentation is the name of the game. Some mistakes are going to be made. Believe me when I tell you : I probably made dozens of mistakes in my first 3 or 4 months trying to make my own pottery at home. This process is all about trial and error. The pots need to be crafted at a uniform level of thickness so that they will not break. If limestone is included, this is going to cause serious problems. Lime contaminants cause pieces of the clay to pop off when they are exposed to the atmosphere.
Pre-Dry Pieces In Your Kitchen Stove
While a kitchen stove is never going to provide the temperatures that are needed for a project of this magnitude, these stoves can play a very important role in the process. Pre-drying the pieces before they are taken outside to be fired is a pivotal step. Setting the oven at 190 degrees is a great way to dry them so that accidents do not take place in an outdoor setting.
Resist the temptation to use a kitchen stove in place of a kiln. This may seem like a smart idea in the moment but you are only placing yourself at risk of having a fire take place. The temperatures that are needed to handle this task are simply not attainable indoors. Clay needs to be fired at a temperature of at least 1,000 degrees.
There is no oven in your home that can replicate these temperatures safely. The safety features that have been designed for the stove are not going to allow you to reach these temperatures. The clay is not going to turn into ceramics that can be sold to a willing customer and this will serve as a waste of money and supplies, as well as probably having angry customers demanding refunds !
Continue With Your Experiments
If the pots that are created end up dissolving in water, this a sign that you did not make the fire hot enough. The color and texture is going to be much different when you create ceramics at home without a kiln and you need to be willing to experiment. Colors and textures are always going to vary. These are not defects, this is just simply part of the learning stage. I did a lot of experimentation when I began making pottery at home, and I also started without having a kiln.
Water may soak through the pot and this is not a defect either. As long as the clay was fired at the proper temperature, this is not an issue that will lead to any long term damages. Pieces can still be created from home to sell to potential customers even if you do not have a kiln. Just be sure you are 100% honest with your customers about this. All you need to do is follow the aforementioned directions and you are well on your way to creating some really nice ceramics !
Please Share on Facebook OR
by tom44 | Jun 29, 2018 | DIY Sculpting

Welcome to my guide on how to start a polymer clay business at home. I hope I can give you enough info here to ensure your success.
Polymer clay is a type of craft compound which is quite easily shaped and molded (or moulded if you are British) into various types of products.
The clay is fired or cured inside an oven instead of the conventional fire brick kiln. It has also become a popular medium for miniature artists, jewelry makers, and kids (even big kids like me). This is why it is not a big surprise that more and more people are interested to learn how to start a polymer clay business at home.
Creating some craft items with the use of polymer clay then selling the finished products for profit is a great way to gain entry into the small business of arts and crafts with very minimal upfront investment.
Later in this article I will share with you 3 effective promotion / advertising strategies which are either free or low cost. Put them into practice and you will get customers quick !
Create Exciting and Unique Crafts
Polymer clay offers a great surface for decoupage artwork and decal transfers. You can form craft products such as decorative ornaments, miniature picture frames, doll body parts and faces, and small vases. You can then sell these items at online craft forums, arts and crafts fairs, and directly to fellow crafters using clay elements in their work.
If you like, you can also buy a type of polymer clay which can turn into an eraser material after being cured.
This will give you the chance to create kid-friendly erasers in various styles and colors. You can then sell these directly to students, parents, and teachers, at back to school fairs, or as a fun fundraiser for PTA.
Design Jewelry Pieces
Being an extremely malleable product, polymer clay is available in an array of textures and colors. The clay doesn’t harden that quick, which makes it easy to form, sculpt, and shape. Common jewelry items made using polymer clay include embellished hair clips, shaped pendants, and beads.
Thanks to the short curing time, you can form simple pieces of polymer clay jewelry quickly to let you form an inventory within a short span of time. If you want to discover how to start a polymer clay business at home, you can make money through having your jewelry pieces up for sale in local boutiques, consignment shops, or mall kiosks.
You can launch a website or you can also sell your pieces in online handmade products platforms such as Etsy.
Sell Accessories Made from Polymer Clay
Polymer clay items range from inexpensive to simple to pricey and complex. You can explore opportunities to distribute polymer clay items to local arts and crafts shops, or you can also have your very own line of supplies and tools. Clay artists usually search for unique shaping and cutting tools, texturized or decorative clay extruders and presses. You can even design your very own molds for clay shaping then sell these on your or better yet, sell your design to a manufacturer of polymer clay.
Be a Polymer Clay Design Teacher
Another way on how to start a polymer clay business at home is to teach polymer clay use and design at the local community or recreation center, or you can also be a private instructor. You can even hire yourself out for kid-friendly functions and birthday parties and help kids design their very own masterpieces using polymer clay. List down the services you want to offer and the charges for each, such as use of supplies and tools, clean up and set up of work space, and individual or group instruction.
 These are only a few great ideas on how to start a polymer clay business at home.
Getting Customers / Making Sales
Promoting your polymer clay sculpting business may turn out to be very enjoyable and provide you with a satisfying challenge, especially when you begin making your first sales and see money coming in.
Here are 3 very effective techniques to begin getting your first customers :
1. Clubs And Groups
Clubs, associations, and organizations which are targeted to people who are interested in polymer clay sculpting or similar hobbies would be an excellent place to start promoting and getting leads / sales.
A few places to find large groups of people online who could potentially become your customers are Google Plus groups, Facebook groups or pages, Tumblr, Twitter and Pinterest.
In addition, you can simply do a quick search on Google for “clay sculpting forums” or “polymer clay forum”.
After finding and joining some of these groups and forums, simply share your tips, ideas, photos of your projects, etc. After a short amount of time, you will capture lots of interest in what you have to offer and start making your first sales.
2. Offer A Prize From A Contest You Create
Offering a prize or bonus to people who enter and win a contest you offer would be a very effective method for promoting your clay sculpting business.
You could offer the winner of the contest one of your best clay sculptures.
You will create an extremely targeted and interested list of potential customers when you offer a valuable prize from a contest, especially if the contestants come from the groups and clubs which you joined and are now a participating member of.
3. Joint Promotions With Other Businesses
Make alliances with other businesses, websites, or groups that you have joined who sell products that are somewhat related to clay sculptures (but not your direct competitors who are trying to sell their own clay creations) and help to get the word out to potential customers for one another.
As an example, you could have an agreement with a flower shop that you will mention their business to your followers on Pinterest, Twitter, Facebook or even to the people who have already bought items from you previously.
In return they can mention to their customers that you create beautiful clay vases and give them your contact info, business card and / or your website address.
Necessary Tools for Polymer Clay Sculpting
Aside from your hands, a block of clay, and an oven, there are still several necessary tools for polymer clay sculpting that you need to make the whole process easier, simpler, and faster.
Work Surface
Your work space must be nonporous. A plastic place mat, glass or plastic cutting board, smooth glass or ceramic tile, craft mat, and other nonporous surfaces can be used. Polymer clay tends to leach oils into porous surfaces such as unsealed stone, bamboo, wood, and others. This will not just ruin the surface as it will also make the clay stiffer once the oils leached out.
Roller
It is important to have something you can use for rolling your clay with. There are a lot of techniques which need a good flat and even polymer clay sheet that you have to roll out. Acrylic rollers will be best for this since these are nonreactive, nonporous, and smooth. Good alternatives include acrylic brayers, a drinking glass with straight side, plastic kitchen rollers, or the side of a pen. As you advance, you will surely want to use a pasta machine for rolling out your polymer sheets.
Clay Blade
One of the necessary tools for polymer clay cutting is something obviously a cutting tool. There are some who use a razor blade or a knife although a clay blade might be a better choice. There are a lot of options out there complete with a set of handles and several blades. You can use the blade to cut shapes, canes, strips, and to lift the clay sheets from the work surface. If you don’t have a clay blade, you will find hard to accomplish these tasks.
Shaping Tools
If you wish to sculpt or make something that has some details or shapes to it, you will need several basic sculpting tools. It can be something as simple as the side of a pen or a tooth pick. However, there are other great tool options for sculpting out there. You can use these tools to create rounded shapes and cups, ruffle flower edges, draw on details, sculpt faces, and others. As you advance, it is expected that you will be adding more tools to your sculpting collection.
Baking Set-up
After you have finished creating your masterpieces using polymer clay, you will have to bake them of course. It is a must that you do it properly since pieces that are under baked will break, while those baked at extremely high temperature will discolor and scorch. You will require an oven thermometer, an insulated tile or pan, with a pen layering, and a foil pain or tent lid to keep your pieces protected from the top element.
These are just some of the necessary tools for polymer sculpting that you will need when starting your own business at home. Having these tools (and knowing how to use them) will ensure that you will be able to create the most stunning masterpieces. Make sure that you add these to your arsenal to enjoy your sculpting even more and find joy in every step of the process as I do !