by tom44 | Oct 28, 2018 | Wood Carving
 – When it comes time to carve a bust in wood, the process can be challenging. In order to keep you from experiencing the issues that we normally experienced, we have prepared this helpful guide that is designed to eliminate the usual concerns.
This tutorial is geared towards the beginner and we have separated each step so that your life is made even easier.
By using the tools that you already have on hand, you can avoid the typical pitfalls. While we will mention a few of the tools that you can purchase, even the most inexperienced carver can get the most out of a single knife such as this one
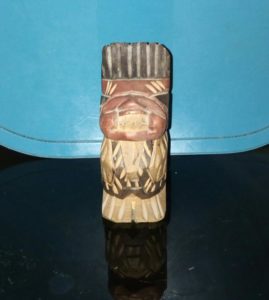
There are a few key steps that need to be taken when the bust is being carved and we are going to go in depth on each one of them. As you might have expected, we are going to start with the head and work our way down from there.
1. Carving The Head
It all starts with the blank. It will be 2″ thick, 4″ high and 2 3-8″ wide. From there, draw a line from the top of the head that starts at the center of the neck. The front plane is then divided into three sections that are equal. This is done in order to establish the nose width. At this time, we can then remove all of the excess materials between the line and form the basic shape of the face.
If you would like to shave down the neck post, this is your time to do so. In order to block out the ears, you will need to draw a C shape from the top to bottom on the center line that was established earlier. There are no hard and fast rules to follow when it comes to this step. Have fun and choose a shape that works for you.
Raising the ear plan is easy. Just make your cut straight into the head by using the pencil line as your guide. If you are not happy with the ear’s position in relation to the head, a second stop cut can be made around your bust’s ear. Don’t worry too much about specific shapes right now. This will come later.
The nose is next. Use a pencil line (drawn horizontally) and stop drawing roughly a quarter of the way down the nose’s front plane. Once the line is drawn, carve a stop cut. This cut should take place along the pencil line. Carve upwards to remove the chips that are left behind. Carving up from the bottom of the bust’s nose to remove the chips is the next step.
Remove chips from the center if you would like the nose to stand out. Pencil the jaw line in just below the ear. The hair line should be drawn from the back of the ear and have a slight backwards slant. Stop cuts are then made along the lines that have been established. Chips must be removed so that wedge shaped grove that is being created is deep enough.
To get rid of any rough edges, round the neck down. Focus on the neck post and the corners of the jaw line. Draw a center line in the front to keep everything well balanced and scoop out wood to define the nose’s sides. These depressions will typically reach the top of the head.
Separating the nostrils is as easy as slicing two parallel lines along the nose’s plane. This creates the ball of the nose and from there, you can slice inward at the nostril bottoms to make openings. Gouging up the nose’s bridge gives you a chance to shape the face as you desire. Don’t be overzealous or you will miss this wood down the road.
Carve along the nostril sides to create an external boundary. This may look blocky but it will all come together. Round off the nostril corners and be sure not to chip off any valuable sections. If you want to round off the ball and bridge of your bust’s nose, just knock the corners off.
Step 2: Carving A Hat (optional)
The blank that is used for this step is 1 3/4″ high and 3 3/4″ long. It will be carved from a 2″ thick piece of basswood. Draw the pencil lines that give you a frame of reference. The center line should be drawn from front to back along the top of the head and on the back and bottom of your chosen blank.
A horizontal line comes next. Remove any sections of wood that keep the hat from being able to form a rough wedge shape. Round off the back side and draw some helpful lines along the blank’s bottom. If you want a rounded contour, remove the corners. Remove any wood around the reference line that was drawn horizontally.
Those who do not wish to add a hat to their bust are welcome to move onto the next step….
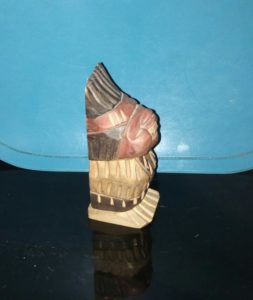
Step 3: Carving The Torso
A 4″ tall blank that is also 1 5-8″ at the bottom and 3 3-8″ along the shoulder lines is needed for this step. Make sure that the blank is oriented vertically before you start to cut. Start with the side profile. Follow the pattern line and cut slightly below the surface in order to free the pieces.
Leave the cutoff sections attached to the main pieces. This will allow you to cut along the front as needed without experiencing too much difficulty. Make your three cuts and then turn the piece around. Get rid of the waste pieces and cut out the front profile. Some may decide to cut out these pieces completely and duct tape them back on later.
A hole must be drilled in the top of the blank. Hold the head beforehand and draw a line so that you know where this hole will be located. Drill the hole straight down into the wood. The neck post should be able to fit squarely inside of the torso and give you some latitude to play with the head’s positioning.
Round off the edges to start carving the bust’s torso. Don’t cut against the grain. The shoulders’ edges should also be rounded off at this time. Carve away the top corners first. From there, you can start to shape the bottom of the torso. Round off any sharp corners that still exist.
This gives you a rough shape to work with. Take off enough wood, so that your bust is not too block shaped. It is better to err on the side of taking off more wood, as opposed to less. If you would like to add a shirt to your bust, this is your chance to do so. You can redraw your lines and add the necessary gouges at this time as well.
Step 4: Crafting a Base
The base is going to have two tiers. Each will be 3/4″, one should be made of oak and the other should be made of pine. You can use whatever wood works best for you, though. To create a pivot point for the circular jig, slice the tip off a finishing nail. Mark the point where the circle is going to be cut out and if you have a band saw, this is your time to use it.
If you don`t have a band saw, click right here to check out the current pricing on a high quality one offered at Amazon.
Put the pivot pin into the marked spot. Cut out the circle by making sure to advance the jig forward. It should bottom out at the cleat that has been attached to your bottom. Spin the stock until the circle has been freed. Don’t worry about the base remaining exactly circular.
Locate a hole that allows for slight overlap over the edge. Use a disk sander to clamp to the table and move your jig until the circle and the disk are touching. Spin the circle completely but make sure that your sander is turned off. You can continue to sand the edges down if need be.
—> On a side note, I was disappointed with all the disk sanders I previously owned, until I got this one made by Black and Decker.
If you would like to create a bottom piece for your base, you will repeat the same steps that were taken for the top piece. The only difference is that the blank will be 4″ in diameter.
Once you have completed this step, all that is left is the painting. We hope that this tutorial has provided you with the knowledge needed to complete your next project. After all, carving a bust in wood is actually much less difficult than it appears (when you know how).
Before you go, you may want to read this post which lists the 5 best wood carving tools for beginners.
by tom44 | Sep 25, 2018 | Wood Carving
Wood carving may seem deceptively simple but there is definitely an art to it. That is why beginners must take the time to learn more about all of the best wood carving tools. There are tools that are specifically designed to assist those who are just getting started out and they offer a number of advantages.

Unless you are willing to put in the proper amount of time and effort when it comes to select your beginner wood carving tools, you are not going to experience the same level of success as those who do. The tools that are selected in these instances should be geared towards making sure that the learning curve is as smooth as possible.
There are a number of questions that are bound to come up when we are in the process of learning the intricacies of wood carving. That is why we have prepared this guide to all of the best beginners’ wood carving tools so that you are able to find out more. Since there is a wide variety of wood carving tools to choose from, this guide is here to assist you…..
A Knife
A knife is the most common and basic tool that a beginning wood carver will need to obtain.
A sharp knife will mostly be used for chip carving and whittling.
The knife blade should be approximately 1 1/2″ long with a handle that is easy for you to hold so as to avoid the knife slipping out of your hands while using it and prevent you from cutting yourself.
Cutting yourself while carving wood is not that much fun, take my word for it !
High carbon steel is the material of first choice when selecting a knife for wood carving / whittling. It should retain its sharpness for quite a while after you sharpen it.
A Chisel
Another basic beginning tool for wood carving is a chisel. This tool comes in different cutting edges, depending on the hardness of the wood. A mallet is generally used to hit the chisel into the wood. For its small size, you get a lot of bang for your buck with a high quality chisel.
A chisel is extremely useful and practical tool to have in your wood carving tool collection and should provide you many years of service if you take proper care of it.
Wood Carving Chisel Set
A wood carving chisel set is one of the first items that you should be purchasing when you are looking to get started in the world of wood carving. A chisel set is the best starting point for anyone who lacks experience. These sets are designed to provide us with the tools that we need to handle a number of different wood carving tasks. These kits also tend to come with tools that have already been sharpened.
These sets often come with wooden handles as well. This makes it much easier for beginners to handle the tools without experiencing any difficulties. They also have their own carrying case. For beginner wood carvers who may need to tote their tools from one class to the next, these sets are an absolute godsend that cannot be ignored.

Power Grip Carving Tools
These tools offer beginners the chance to enjoy a much more solid grip when they are completing their projects and best of all, they are incredibly durable. That means that you can purchase your power grip carving tools at the very beginning of your wood carving journey and still have them by the time you are rounding into proficiency.
Grip is everything when you are selecting tools of this nature. This is how a beginner carver learns how to control their tools. Simple wood carving tools become even easier when you have access to the precision that power grip carving tools have to offer. These tools are typically offered along with a helpful carrying case that makes organization a total snap.
Power Carvers
This is a tool that is truly designed to remove all of the guesswork from the proceedings. These electric wood carving tools make life simple. They are essentially fool proof and anyone can use them to their benefit. Power carving tools are designed to be light to the touch. There is no vibration for the beginner wood carver to be worried about when using power carvers.
Best of all, they offer a certain amount of precision that cannot be matched anywhere else. When we are just learning how to handle various wood carving tools, it never hurts to have the versatility of a power wood carver on hand. All of the projects that you have in mind are well within your grasp when you equip yourself with the proper tools. Power carvers are just one of the few that every beginner wood carver should have.
Whittling and Roughing Tools
While there are a number of woodcarving tools that come with various tools, the importance of whittling and roughing tools can never be discounted. This tool is also easier to store because there is just one knife to worry about. These knives are designed to handle any whittling and roughing concerns that are bound to come up. When we are working with wood that needs to be roughed out a bit, this becomes important.
These tools are especially effective when delicate wood carving tasks need to take place. Making cuts in hollow areas has never been easier. The same goes for beginner carvers who are looking to make smoother and shinier cuts. The accuracy that a whittling and roughing tool has to offer cannot and should not ever fall by the wayside. With these tools, you are also not limited to any specific projects.
Children’s Carving Tools
Parents who are looking to make sure that their little ones are not being exposed to any dangers when they are learning the ins and outs of wood carving should definitely take the time to seek out carving tools that are geared for their youngsters. There are some children who may have the ability to handle using adult tools but this tends to be the exception. It is not the norm and should never be treated as such.
Children who are given adult tools and expect to learn wood carving may or may not experience the desired level of success. It is a true “sink or swim” proposition. That is why it is best to equip children with tools that are specifically designed for their needs. This allows parents to enjoy the peace of mind that comes with knowing that their little ones are safe while they pursue their new favorite hobby.
by tom44 | Sep 13, 2018 | DIY Sculpting

So you’ve decided to start sculpting ? Go figure! Sculpting miniatures is quite an interesting field and a lot of fun.
However, you will definitely need some sense of imagination and love for action figures, at the very least, and if you enjoy getting better at something, even better. But you need not worry, you’ve come to the right place to learn some helpful pointers.
Before we get started, you need to ask yourself this; what type of miniature do you want to make ? Afterward, you can proceed and start with your handy work.
In this article, therefore, I will give you a brief description on how to sculpt miniatures. More than that, I will provide you with any other relevant information that might help you get the best design.
How To Sculpt Miniatures
To get the right miniature, you will need to put in some effort and spend time on the idea. Additionally, for your design to have that “close to perfect” touch, you will have to practice.
As you are just getting started on sculpting, it’s probably a good idea if you work on creating dwarves first. That’s if you want to make figures.
An average of 1 to 6 inches is the perfect size for a figure. You will need to get used to the craft and obviously, that means you need to practice.
But today is your lucky day. This article will not only teach you how to sculpt miniatures but will also give you the required practice.
The best part is that I will not start you off with those expensive materials you need to make your art. Instead, we’ll start off with clay. And if you are planning to sell your model, you will have to find out how many such models have been sold in the past.
Also, what are the major reasons why some people who have tried making such miniatures have failed ? All this will help get a better experience on your art.
Getting Started
Simply start with your imagination. Are you trying to make an action figure or just something simple ? Either way, you need to have a clear image of what you’re about to make.
Second, try making a clay curvature of your miniature. Like I said earlier, miniatures are about 1 to 6 inches in size. Keep on trying until you get the right shape. This will give you the exposure you need. At the same time, you will come up with smarter and faster ways to get the job done. Now you can spend time buying the required materials to go commercial with your business.
At this point, you have two choices; you can either choose to make a miniature for your own collection or chose to make an extra buck or 2 with your newly acquired talent. Regardless, you will need proper materials to make this happen.
Tools To Get For Sculpting Miniatures
- Color Shaping Tools
These tools can be found in most art supply stores. With these tools, you will be able to control the shapes of different paper clays, epoxy, and polymer clays. More importantly, you can use these tools to move any moistened paper to fill tiny gaps. Even when repairing your miniatures, you can use these tools.
There is a wide range of shapes, tip styles and firmness of these tools. Therefore you need to make sure what you need before buying them. The best part is that they offer a wide range of uses. I guarantee you, every color shaping tool is important to your craft.
- Loop Tools
For any beginner, you will need these loop tools. They are narrow metal loops that you can use to smoothen curves or corners. You can also use it to create texture or patterns. Additionally, these loops can be used to level up materials across a specific area. That is because the looped blades can rest on any raised region as you fill the material on the lower gaps of your art.
- Rolling pin
This is useful when it comes to making miniatures using paper clay, polymer clay or any other clay material. If you are on a tight budget or you simply can’t find the right rolling pin, then a plastic supply house is all you need. This will help you get the proper shapes for different crafts. It also comes with a glass board where you can do all your rolling.
- Clay Modelling tools
These are wooden tools that will help you get the best out of your work. They are also available online or from craft suppliers. These tools are useful when you need to create curves on your models or creating that smooth edge. In a three-dimensional shape, you will be able to control curves and cut lines in any model material.
- Flexible Blade Knife
This is an amazing blade that will help you create a great curvature on your model. The blade is great when you want to make a slice through your polymer clay. They also work well in scoring lines for your tiles. It can also work well with any miniature of your choice.
Making Your Miniature
Now that you have all the materials and the imagination, then let’s get to the interesting part. Get the drawing on paper by using a pencil. This will help you have a clear picture of your miniature before you start. I recommend you create lots of different drawings to help you get a clear anatomical view.
Then, make a sketch of the miniature using a wire. Call it a skeleton of your final copy. Afterward, you can use this to mount your miniature as you attain a more stable figure. This sculpture will give you the chance to continue practicing your skills as you get better at your work.
Finally, you need to make a serious sculpture using ProCreate and a good stylus pen in order to have that fine small miniature which you have already seen in your mind`s eye. Use modern tools and technology so that you can make your miniature have more detail and style. It will make a huge difference that you and others will clearly see.
Final Verdict
In conclusion, I hope you now have a better understanding of how to make that perfect miniature which originates from your own imagination. Stay tuned for more tips on sculpting miniatures and other sculpture projects.