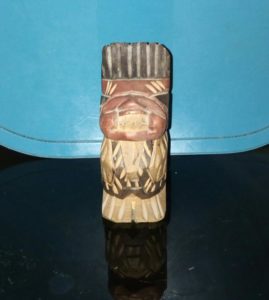
– When it comes time to carve a bust in wood, the process can be challenging. In order to keep you from experiencing the issues that we normally experienced, we have prepared this helpful guide that is designed to eliminate the usual concerns.
This tutorial is geared towards the beginner and we have separated each step so that your life is made even easier.
By using the tools that you already have on hand, you can avoid the typical pitfalls. While we will mention a few of the tools that you can purchase, even the most inexperienced carver can get the most out of a single knife such as this one
There are a few key steps that need to be taken when the bust is being carved and we are going to go in depth on each one of them. As you might have expected, we are going to start with the head and work our way down from there.
1. Carving The Head
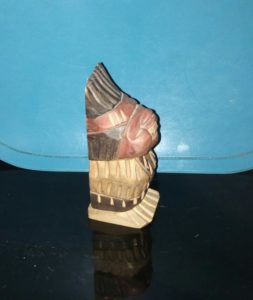
It all starts with the blank. It will be 2″ thick, 4″ high and 2 3-8″ wide. From there, draw a line from the top of the head that starts at the center of the neck. The front plane is then divided into three sections that are equal. This is done in order to establish the nose width. At this time, we can then remove all of the excess materials between the line and form the basic shape of the face.
If you would like to shave down the neck post, this is your time to do so. In order to block out the ears, you will need to draw a C shape from the top to bottom on the center line that was established earlier. There are no hard and fast rules to follow when it comes to this step. Have fun and choose a shape that works for you.
Raising the ear plan is easy. Just make your cut straight into the head by using the pencil line as your guide. If you are not happy with the ear’s position in relation to the head, a second stop cut can be made around your bust’s ear. Don’t worry too much about specific shapes right now. This will come later.
The nose is next. Use a pencil line (drawn horizontally) and stop drawing roughly a quarter of the way down the nose’s front plane. Once the line is drawn, carve a stop cut. This cut should take place along the pencil line. Carve upwards to remove the chips that are left behind. Carving up from the bottom of the bust’s nose to remove the chips is the next step.
Remove chips from the center if you would like the nose to stand out. Pencil the jaw line in just below the ear. The hair line should be drawn from the back of the ear and have a slight backwards slant. Stop cuts are then made along the lines that have been established. Chips must be removed so that wedge shaped grove that is being created is deep enough.
To get rid of any rough edges, round the neck down. Focus on the neck post and the corners of the jaw line. Draw a center line in the front to keep everything well balanced and scoop out wood to define the nose’s sides. These depressions will typically reach the top of the head.
Separating the nostrils is as easy as slicing two parallel lines along the nose’s plane. This creates the ball of the nose and from there, you can slice inward at the nostril bottoms to make openings. Gouging up the nose’s bridge gives you a chance to shape the face as you desire. Don’t be overzealous or you will miss this wood down the road.
Carve along the nostril sides to create an external boundary. This may look blocky but it will all come together. Round off the nostril corners and be sure not to chip off any valuable sections. If you want to round off the ball and bridge of your bust’s nose, just knock the corners off.
Step 2: Carving A Hat (optional)
The blank that is used for this step is 1 3/4″ high and 3 3/4″ long. It will be carved from a 2″ thick piece of basswood. Draw the pencil lines that give you a frame of reference. The center line should be drawn from front to back along the top of the head and on the back and bottom of your chosen blank.
A horizontal line comes next. Remove any sections of wood that keep the hat from being able to form a rough wedge shape. Round off the back side and draw some helpful lines along the blank’s bottom. If you want a rounded contour, remove the corners. Remove any wood around the reference line that was drawn horizontally.
Those who do not wish to add a hat to their bust are welcome to move onto the next step….
Step 3: Carving The Torso
A 4″ tall blank that is also 1 5-8″ at the bottom and 3 3-8″ along the shoulder lines is needed for this step. Make sure that the blank is oriented vertically before you start to cut. Start with the side profile. Follow the pattern line and cut slightly below the surface in order to free the pieces.
Leave the cutoff sections attached to the main pieces. This will allow you to cut along the front as needed without experiencing too much difficulty. Make your three cuts and then turn the piece around. Get rid of the waste pieces and cut out the front profile. Some may decide to cut out these pieces completely and duct tape them back on later.
A hole must be drilled in the top of the blank. Hold the head beforehand and draw a line so that you know where this hole will be located. Drill the hole straight down into the wood. The neck post should be able to fit squarely inside of the torso and give you some latitude to play with the head’s positioning.
Round off the edges to start carving the bust’s torso. Don’t cut against the grain. The shoulders’ edges should also be rounded off at this time. Carve away the top corners first. From there, you can start to shape the bottom of the torso. Round off any sharp corners that still exist.
This gives you a rough shape to work with. Take off enough wood, so that your bust is not too block shaped. It is better to err on the side of taking off more wood, as opposed to less. If you would like to add a shirt to your bust, this is your chance to do so. You can redraw your lines and add the necessary gouges at this time as well.
Step 4: Crafting a Base
The base is going to have two tiers. Each will be 3/4″, one should be made of oak and the other should be made of pine. You can use whatever wood works best for you, though. To create a pivot point for the circular jig, slice the tip off a finishing nail. Mark the point where the circle is going to be cut out and if you have a band saw, this is your time to use it.
If you don`t have a band saw, click right here to check out the current pricing on a high quality one offered at Amazon.
Put the pivot pin into the marked spot. Cut out the circle by making sure to advance the jig forward. It should bottom out at the cleat that has been attached to your bottom. Spin the stock until the circle has been freed. Don’t worry about the base remaining exactly circular.
Locate a hole that allows for slight overlap over the edge. Use a disk sander to clamp to the table and move your jig until the circle and the disk are touching. Spin the circle completely but make sure that your sander is turned off. You can continue to sand the edges down if need be.
—> On a side note, I was disappointed with all the disk sanders I previously owned, until I got this one made by Black and Decker.
If you would like to create a bottom piece for your base, you will repeat the same steps that were taken for the top piece. The only difference is that the blank will be 4″ in diameter.
Once you have completed this step, all that is left is the painting. We hope that this tutorial has provided you with the knowledge needed to complete your next project. After all, carving a bust in wood is actually much less difficult than it appears (when you know how).
Before you go, you may want to read this post which lists the 5 best wood carving tools for beginners.